Original Crankfire Installation Tutorial
This tutorial was created to assist Crankfire owners with installation of the Crankfire unit. Since text based manuals don't provide a clear "picture" with some aspects of installation, I hope the following tutorial will be of some help.
Before beginning make sure you have the following pieces.
A. Main Crankfire Unit
B. Trigger sleeve retention pin
C. Trigger sleeve
D. Mounting collar
E. Two mounting screws
 You will also need the following tools. A Allen wrench Set, Locktite Purple (or Blue), and a 7/16ths wrench.
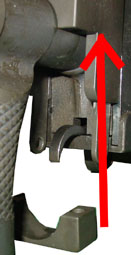
 The first thing we want to do is slide the Crankfire unit down on top of the grip mount. Make sure the unit does not have the mounting collar installed or the trigger sleeve in place because it will not fit into position. Place the unit a few inches back from the back plate (indicated by blue arrow in the picture to the right) or else it wont clear the recoil spring retainer.
 And then slide it forward into position (pictured right). NOTE: Since the unit is slightly larger in width then your gun just make sure it is level and evenly spaced on both sides or else it could bind up when firing.
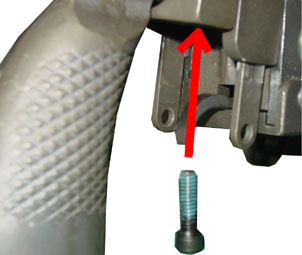 To mount the unit onto the gun use the U-shaped collar mount. I recommend doing this step first with NO Locktite on the screws until you make sure it the unit functions properly. When every thing is ship shape add Locktite to the screws so they don't wiggle out. To secure the unit, place the U-shaped collar under the unit and screw the two screws in by hand until they are snug. Make sure its just enough to hold the unit on, don't tighten them completely yet. Now make sure the unit is lined up straight, if not loosen the screws and reposition.
 Once you have made sure every thing is lined up ok, go ahead and tighten the screws with the Allen wrench.
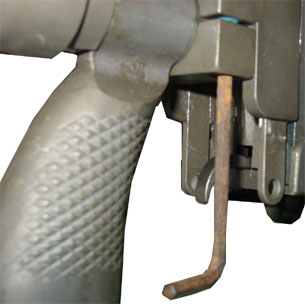
 Next take the trigger sleeve and its retainer pin and insert it between the two "forks" protruding below the trigger.
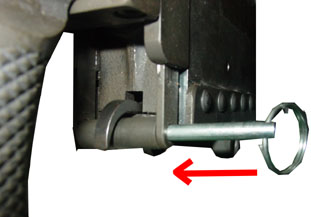 Once in place insert the pin completely to secure it in place.
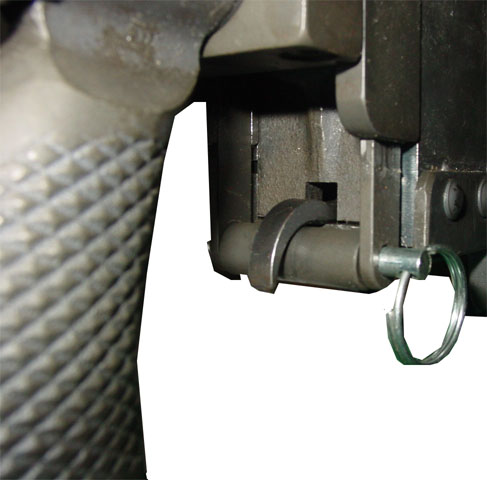 If the space between the trigger sleeve is very large, or so close that it pulling up on the trigger with out even being cranked, then it needs to be adjusted. The optimal amount of space between the sleeve and the trigger gap should be just enough to stick a thick piece of paper through. Mine, which is adjusted correctly, is pictured to the left for reference.
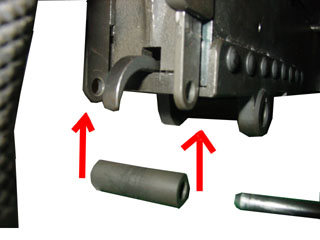
 If you have a large gap between the sleeve and the trigger, and or the sleeve is pulling up on the trigger when the gun is not being cranked you need to adjust the height at which the sleeve sits at rest.
To do this, first remove the two screws from the top panel of the unit.
If you have a large gap between the sleeve and the trigger, and or the sleeve is pulling up on the trigger when the gun is not being cranked you need to adjust the height at which the sleeve sits at rest.
To do this, first remove the two screws from the top panel of the unit.
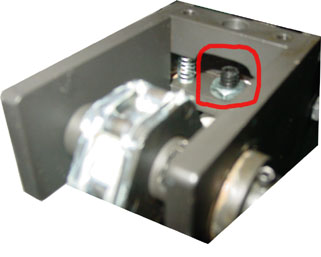 Once removed you will see a Allen screw with a nut around it.
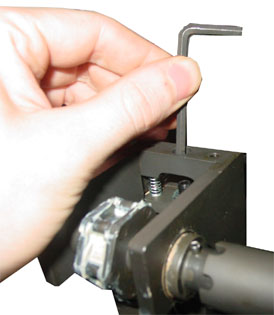 To adjust the height, loosen the nut with the wrench and then use a Allen wrench on the set screw until the sleeve is at the desired height. Once you have it set correctly tighten the jam nut to secure the setscrew in place and then reinstall the top cover.
And that's it, you have successfully installed the Crankfire unit. Please refer back to the text manual for a more detailed description of fine-tuning the Crankfire.
To adjust the height, loosen the nut with the wrench and then use a Allen wrench on the set screw until the sleeve is at the desired height. Once you have it set correctly tighten the jam nut to secure the setscrew in place and then reinstall the top cover.
And that's it, you have successfully installed the Crankfire unit. Please refer back to the text manual for a more detailed description of fine-tuning the Crankfire.